Introduction
A Smart View is a focused look at the Grade Centre, set up to facilitate more convenient or more effective use of the Grade Centre. It shows only those columns which match a particular set of user-defined criteria, and can be saved for future use. When the Grade Centre includes a great number of students and columns, you can use smart views to quickly find data, but you can also use Smart Views to present key data to specific staff e.g. moderators and external examiners.
Potential uses
With smart views, you can see:
- specific students
– If you are only interested in seeing marks for certain students, you can create a Smart View that will only show the information that you need.
This can be particularly useful for showing moderators / external examiners a small subset of students and marks.
– You could also create a smart view to track students with low scores to quickly see which students need help.
– Or you could set up a Smart View to show students who have not submitted to a particular assessment.
- specific assessments
– You can create a Smart View to display only two columns in the Grade Centre grid: for example, you could show a calculated total column for online tests and a calculated total column for assignments. You can compare the two columns to gauge how students are performing on each type of assessment.
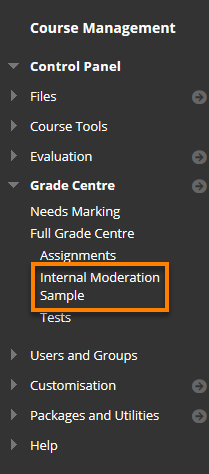
Viewing Smart Views in the Control Panel
In the Grade Centre section of the Control Panel, favourite smart views appear in alphabetical order as an indented list in the Full Grade Centre section. In a new course, the Assignments and Tests smart views appear in the list by default. When you click the Assignments link, the Grade Centre page opens and only assignment columns appear in the grid.
You can tag your own smart views as favourites so they appear in the list, allowing you to easily navigate from one view to another.

Types of Smart View in the Grade Centre
Each Smart View allows you to access a set of columns in the Grade Centre grid. For example, when you access the Tests Smart View, only Test columns appear in the grid. When you enable grading for blogs, journals, and discussions, those mark columns appear when you access the appropriate Smart View.
The default Smart Views include Assignments, Discussion Boards, Preview of My Grades (Displays all columns visible to students) and Tests, amongst others. Besides the defaults, you can create five types of smart views in the Grade Centre:
- Course Group: Subsections of students. You must create course groups before you can use them as selection criteria.
- Performance: Student performance on a single item, such as a test.
- User: Individual students.
- Category and Status: Based on a category, user or users, and mark status. For example, you can select the Blog category, one or more users or groups, and a status, such as Completed.
- Custom: A query for selecting students using a combination of attributes.
How to Access the Smart Views List in the Grade Centre
To access the list of smart views:
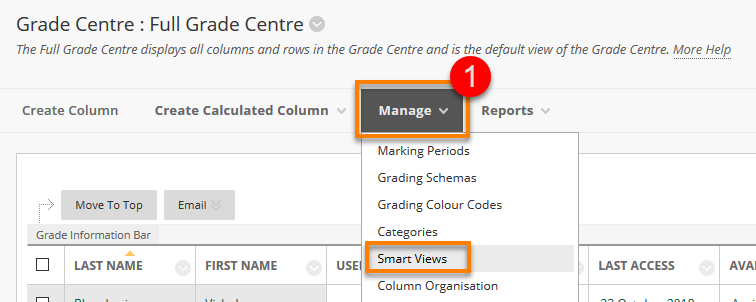
1. In the Grade Centre, point to Manage on the action bar and click Smart Views.
2. On the Smart Views page, the list of smart views appears. In the Type column, all default smart views are designated as System. When you create your own smart views, Custom appears in the Type column.
3. Click a Smart View title to open the Grade Centre with the appropriate columns in the grid.
4. You can edit and copy default system Smart Views, but you cannot delete them. Access a Smart View’s contextual menu for options.
How to Create Smart Views in the Grade Centre
The process for creating the five types of smart views is similar.
1. In the Grade Centre, point to Manage on the action bar and click Smart Views.
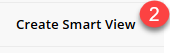
2. On the Smart Views page, click Create Smart View on the action bar.
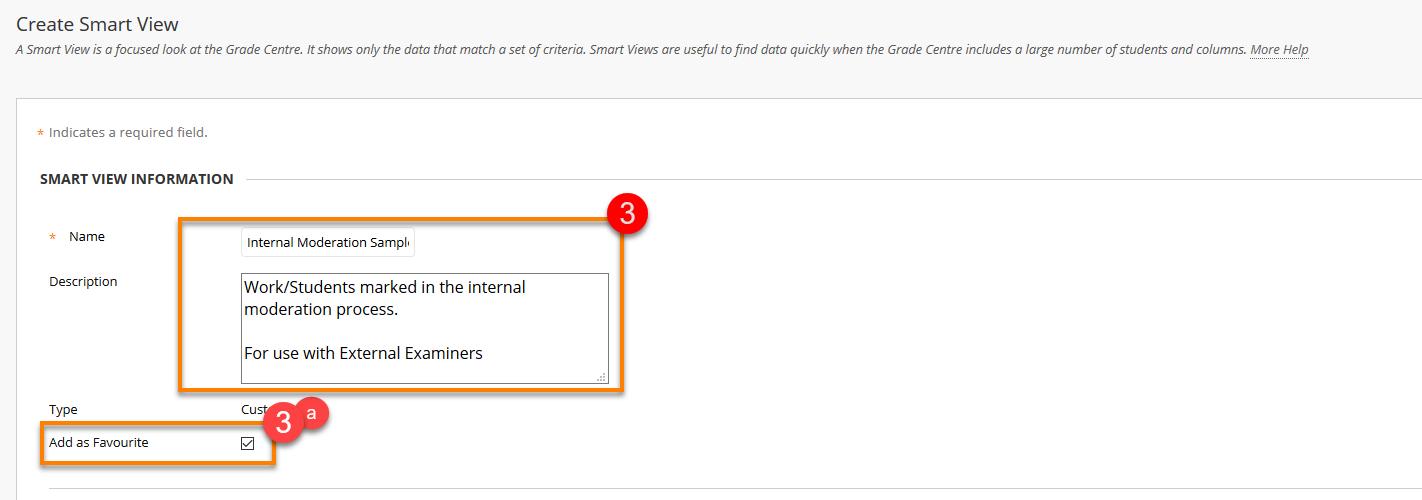
3. On the Create Smart Views page, type a name and an optional description. The description can assist with identifying the smart view.
3a. Optionally, select the Add as Favourite check box to make the smart view a favourite.
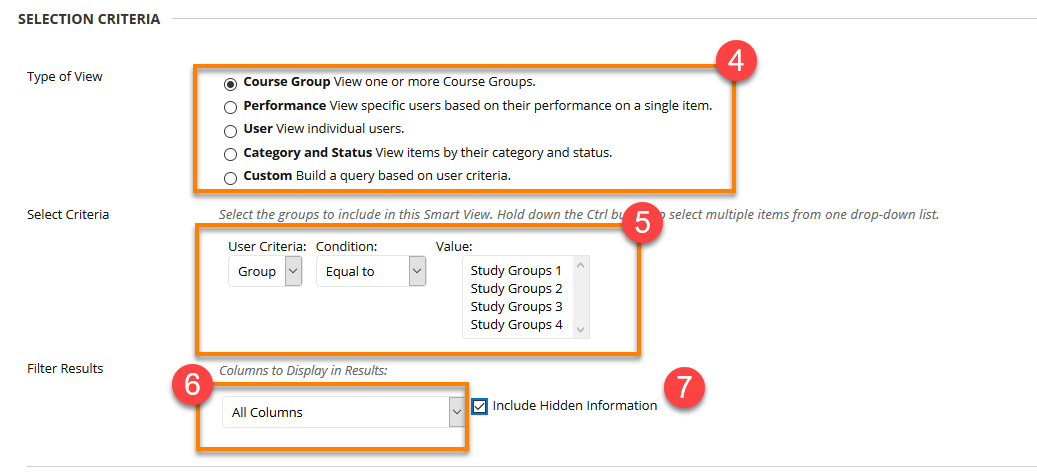
4. For Type make a selection.
5. In the Selection Criteria section, set the requirements.
6. In the Filter Results drop-down list, select which columns, categories, statuses, or grading periods you want to appear in the Grade Centre grid when you access the smart view. For example, when tracking a specific group, you can narrow your view of columns appearing in the Grade Centre by filtering the results by a category, such as Tests, or view only specific group assignment columns.
7. If the Include Hidden Information check box appears, you can select it to display hidden columns pertaining to the filter. When viewing the smart view, the columns you hid on the Column Organisation page appear in the grid also.
8. Click Submit.
The smart view will appear on the Smart Views page. Click the title to display it in the Grade Centre.
If you ticked ‘Add as Favourite’ the Smart View will also be listed under Control Panel > Grade Centre.
How to Add Smart Views to the Favourites List
You can add Smart Views to the favourites list on the Control Panel so you can access them easily.
1. In the Grade Centre, point to Manage on the action bar and click Smart Views.
2. On the Smart Views page, click the star icon ![]() in the Add as Favourite column.
in the Add as Favourite column.
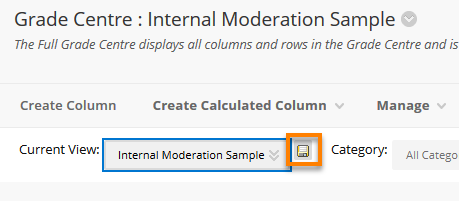
Quick Tips

You can easily move between the Full Grade Centre view and any of the available Smart Views: go to Filter and select the Smart View you require.


From the same screen you can set a Smart View as your default view of the Grade Centre – just click on the Save icon as shown. You can change this setting at any time.
Page last updated on July 8, 2019 by Sev Raychev

You must be logged in to post a comment.