The Meeting Organiser and Presenters in a meeting have the ability to manage the settings of other participants.
During a meeting, you can:
- Change the role of a individual participant (for example, promote a participant to presenter).
- Mute all participants.
- Mute individual participants.
- Control the ability of attendees to unmute their mics (Meeting Organiser only).
- Remove a participant from the meeting.
The Meeting Organiser (the person who set up the meeting) can set the default permissions for particpants in the meeting by going to the Meeting Options. This can be done before and during the meeting.
Important: You should edit the Meeting Options to ensure that students join your meeting as ‘attendees’. This gives you control of the meeting and prevents students from being able to mute your audio or take control of your presentation.
See MS Teams: controlling who can present.
Give an individual attendee presenter permissions
If everyone joins the meeting with the role of attendee, you can choose to make individual attendees a Presenter.
You also need to do this if you have chosen not to allow attendees to unmute their mics and you want an individual student to speak, without allowing others to unmute their mics. You cannot unmute the mic of an indivudal attendee to allow them to speak when the ‘Don’t allow attendees to unmute’ setting is enabled.
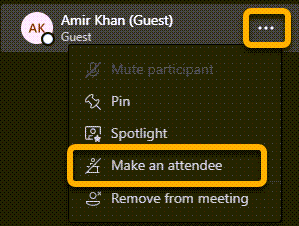
1. Go to the Participants panel, and find the person you want to unmute.
2. Hover your mouse cursor over the name of the person in the list of attendees and click the More options button that appears.
3. Click ‘Make a presenter‘ from the the drop down menu.
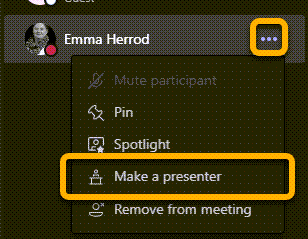
To reverse this, repeat the process and click ‘Make an attendee’ from the drop down menu.
Mute all participants in a meeting
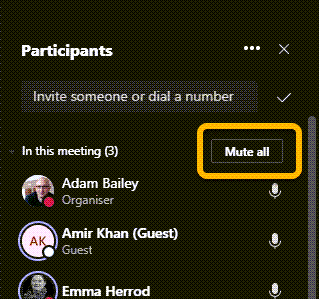
It may be necessary to mute everyone in a meeting to prevent unexpected noises or to regain the attention of a large number of participants.
1. On the meeting toolbar, click the Show Participants button.
2. In the Participants panel, click the ‘Mute all‘ button, at the top of the list showing who is in the meeting.
Everyone’s mic is muted and the mic icon beside each participant in the meeting is shown with a line through it to indicate it is muted.
Mute individual participants in a meeting
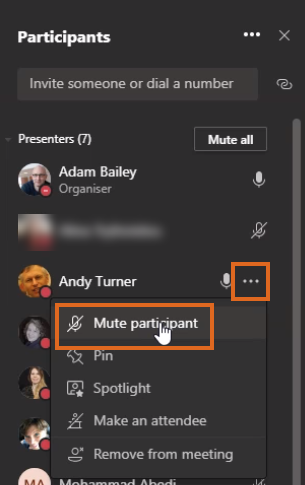
1. On the meeting toolbar, click the Show Participants button.
2. Hover your mouse cursor over the name of the person in the list of attendees and click the More options button that appears.
3. Click ‘Mute participant‘ from the the drop down menu.
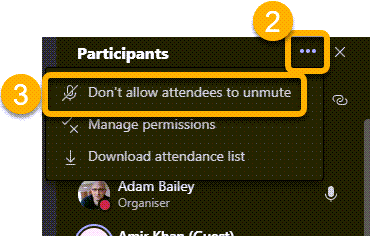
Control the ability of attendees to unmute their mic
If you are the Meeting Organiser, you can stop all attendees from unmuting their mic.
This is useful if you want to avoid any interruptions when you are speaking and to manage conversations with large groups.
You can then choose to allow individual attendees to speak by making them a Presenter temporarily.
1. On the meeting toolbar, click the Show Participants button.
2. In the Participants panel, click the More Actions button.
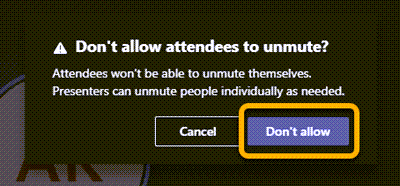
3. Click ‘Don’t allow attendees to unmute’ from the drop down menu that appears.
4. Click the Don’t allow button in pop window appears asking you to confirm you want to carry out this action.
All mics of all the attendees are muted and they are prevented from speaking.
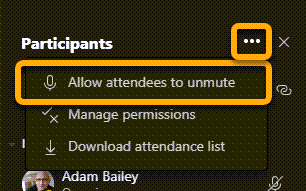
To reverse this setting and allow attendees to unmute:
1. Go to the Participants panel, click the More actions button.
2. And click ‘Allow attendees to unmute‘ from the drop down menu.
Remove a particpant from the meeting
In the unlikely event that a participant needs to be removed from a meeting.
1. On the meeting toolbar, click the Show Participants button.
2. Hover your mouse cursor over the name of the person in the list of attendees and click the More options button that appears.
3. Click ‘Remove from meeting‘ from the the drop down menu.
Page last updated on October 12, 2020 by adambailey

You must be logged in to post a comment.