Editing videos can be time consuming and the end results can have little impact on student learning. Our advice when creating content is to avoid editing where possible, however we understand that there may be some scenarios where edits are necessary, these include:
- Editing out material from recorded sessions
- Removing unwanted content from the start or end of a video
- Annotating pre-recorded content
- Enhancing content with quizzes or surveys
Most of the editing required for your screencasts can be achieved without spending money on premium tools with editing capabilities, and the free tools available at the University have a lot of functionality that can help you trim, cut, annotate, and enhance your videos.
- Trim – remove a section or sections from the beginning or end of a video (different to cutting sections from the middle of a video)
- Cut – remove a section or sections from any part of a video
- Annotate – add text, images, or other overlayed information or graphics onto a video that were not part of the original recording
- Enhance – edit the sound levels or quality on a video; add quizzes or interactive elements to a video; apply higher level production, such as adding music, fades, or effects
Using YuJa to Edit
YuJa has a browser-based editor, which allows you to make edits to your Classroom Capture and Personal Capture content, including an in-built Quizzing tool to insert YuJa Quiz content into your videos .
Please see out Support Site for further information on editing with YuJa.
Additional Free Tools
The tools referenced here are currently available to University staff and require no purchase. Be aware that iMovie is not available for Windows users and that Windows apps may not be available for Mac users.
PowerPoint
Although PowerPoint does not have video editing capabilities, it is possible to edit a PowerPoint where narration has been recorded and re-record individual slides.
This provides a simple way to update content on a slide, or re-record any slides where there was an issue with narration or incorrect information.
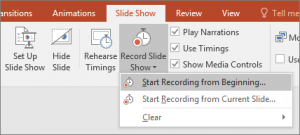
- To re-record content on a slide, click 'Record slide show' and 'Start recording from Current Slide'. 'Start Recording from Beginning' will allow you to re-record from the start of the presentation. Recording over narration on a slide will permanently delete the previous narration.
- Once you have made edits to individual slides or narration, you will need to export the presentation to video again - you can upload directly to Stream from PowerPoint.
Windows 10 Photos App
The Photos App in Windows 10 contains a fairly powerful editing suite that will allow you to trim, cut, annotate, and enhance your videos. It has some limitations compared to premium tools like Camtasia, but enables users to:
- Trim the beginning and end of videos on a timeline
- Cut, rearrange, and separate sections of a video
- Annotate with basic text annotations and Title Cards
- Enhance videos by adding pre-recorded audio, video, music, and effects; combining two or more videos; adjusting the volume of audio on video clips; applying filters; panning and zooming the view on screen
Please note: This video has no audio
The Photos App also allows you to combine multiple video files together and insert images into the timeline of a video.
Be aware that some of the edits may require you to split a video into sections using the tool.
The Photos App does not upload directly to Stream, so you will need to export your video as an mp4 before uploading. The Photos App is only available to Windows users.
iMovie
iMovie is Apple's own video editing suite and is available free to Mac users.
iMovie has a fairly powerful editing suite that will allow you to trim, cut, annotate, and enhance your videos. It has some limitations compared to premium tools like Camtasia, but enables users to:
- Trim the beginning and end of videos on a timeline
- Cut, rearrange, and separate sections of a video
- Annotate with basic text annotations and titles
- Enhance videos by adding pre-recorded audio and video, music, and effects; combining two or more videos; adjusting the volume of audio on video clips; applying filters and transitions; panning and zooming the view on screen
Premium Tools
The tools referenced here have been approved by the Design Authority Group for purchase and should be purchased through your department if you believe that you require the ability to perform advanced edits. Please contact your School DTS business partner for purchase requests. Be aware that creating polished or complex video projects can be time consuming.
Camtasia
Camtasia has been approved by the Design Authority Group (DAG) for purchase by University staff. If you believe that you need to purchase Camtasia, please contact your SDTL.
Camtasia is a powerful recording and editing tool, which enables users to:
- Trim the beginning and end of videos on a timeline
- Cut, rearrange, and separate sections of a video
- Annotate with animations, graphics, text, Title Cards, and more
- Enhance videos by adding and editing audio, video, music, and effects; combining two or more videos; adjusting the volume of audio on video clips; applying filters; panning and zooming the view on screen; adding in-built quizzes - Be aware that Camtasia's in-built quizzes require a special player when exported and will not work when uploaded to MS Stream. If you wish to add quizzes to your videos, consider using the MS Forms integration in Stream.
You can find out more about Camtasia on the Techsmith website.
LinkedIn Learning offers comprehensive guidance on how to use Camtasia for advanced video editing projects.
Other premium tools
If you plan to use any other premium tools, please ensure that they have been approved for purchase by the Design Authority Group (DAG). Contact your SDTL before purchasing any software.
