PowerPoint is a free application available to all university staff that has options to record your screen and presentations. We recommend upgrading to Office 365 to get the most out of PowerPoint.
Before you record, ensure you have followed our guidance on creating accessible screencasts.
Both of the methods on this page can be exported as videos, as well as saved as PowerPoint presentations. There is no in-built editor available for cutting out sections, however it is possible to re-record content onto individual slides.
Be aware that PowerPoint presentations cut audio whilst changing slides, so it is best practice to pause your narration before moving to the next slide.
Record a slideshow with narration
You can record a slideshow with narration and timings using the in-built tools in PowerPoint. This option can be found on the ‘Slide Show’ tab under ‘Record Slide Show’.
To get ready to record, select Record Slide Show on the Slide Show tab of the ribbon. You can also add a Recording tab to the ribbon (see Customize the ribbon).

- Clicking the upper half of the button starts recording from the current slide
- Clicking the lower half of the button gives you the option to start from the beginning or from the current slide. To re-record sections of a presentation, find the slide you want to re-record and select "from current slide". This will overwrite the narration for that slide.
The slide show opens in the Recording window (which looks similar to Presenter view), with buttons at the top left for starting, pausing, and stopping the recording.
Click the round, red button (or press R on your keyboard) when you are ready to start the recording, after a three-second countdown.
Be aware, PowerPoint will not record sound during transitions between slides. Take a small pause in your narration before moving to the next slide.
- The current slide is shown in the main pane of the Recording window.
- You can pause the recording at any time by pressing
- You can stop the recording any time by pressing Alt+S on your keyboard.
- Navigation arrows on either side of the current slide allow you to move to the previous and next slides.
- PowerPoint for Microsoft 365 automatically records the time you spend on each slide, including any Animate text or objects steps that occur, and the use of any triggers on each slide.
- The buttons at the lower-right corner of the window allow you to toggle on or off the microphone, camera, and camera preview.
To end your recording, select the square Stop button (or press S on your keyboard).
When you finish recording, you will see either an audio track, or a camera a preview in the lower-right corner of the recorded slides.
Record your screen
You can also use PowerPoint to record a section of your screen, by creating a new, blank slide, clicking on the ‘Insert’ tab and selecting ‘Screen Recording’.
To get ready to record your screen, select Screen Recording on the Insert tab of the ribbon. You can also add a Recording tab to the ribbon (see Customize the ribbon).

- On the Control Dock, click Select Area (Windows logo key+Shift+A), or, if you want to select the entire screen for recording, press Windows logo key+Shift+F (only for newer versions of Office).
- Click and drag to select the area of the screen you want to record.
PowerPoint automatically records the audio and the mouse pointer, so by default those options are selected on the control dock. To turn them off, deselect Audio (Windows logo key+Shift+U) and Record Pointer (Windows logo key+Shift+O).
- Click Record (Windows logo key+Shift+R).
Unless you pin the Control Dock to the screen, it will slide up into the margin while you record. To make the unpinned Control Dock reappear, point the mouse cursor at the top of the screen.
You may find these keyboard shortcuts helpful when recording:
- Click Pause to temporarily stop the recording (Windows logo key+Shift+R).
- Click Record to resume recording (Windows logo key+Shift+R).
- Click Stop to end your recording (Windows logo key+Shift+Q) (shown below).
The recording will be embedded on the new blank slide you created and can be can be exported as video.
Customise the ribbon
If you’d like to have all of your Recording options on one tab on your Ribbon in PowerPoint, you can now add the ‘Recording’ tab in Office 365.
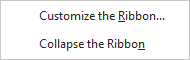
To do this, you can either right click on an empty part of the ribbon and select ‘Customize Ribbon’
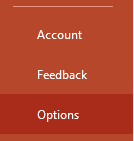
or click ‘File’ and select ‘Options’ at the bottom of the page.
Either of these methods will open the PowerPoint Options Window. Select ‘Customize the Ribbon’ from the left-hand side menu to view all options for the Ribbon.
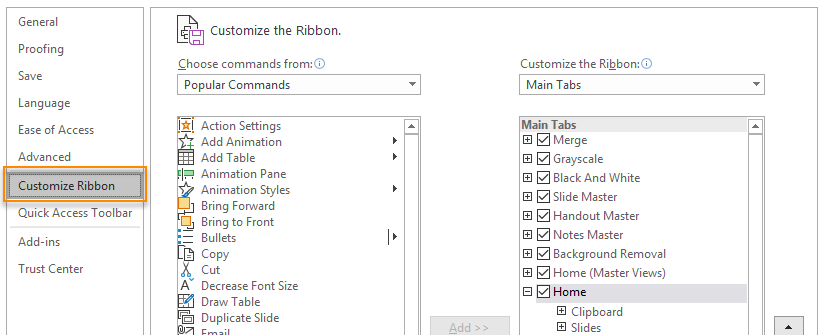
Then, scroll down in the Customise the Ribbon menu and select ‘Recording’.
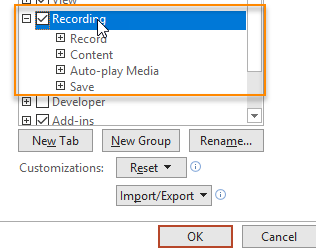
Once you have selected everything you you want to appear on the Ribbon, click ‘OK’ to close the PowerPoint Options window. Your new ‘Recording’ tab will be available in the Ribbon at the top of the screen.
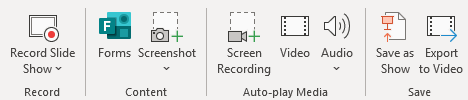
You can then use this Tab for all stages of the recording process, from start to finish.
Page last updated on July 2, 2020 by mattjones