In addition to the Collaborate Course Room, you can create any number of date-restricted sessions.
You can choose different settings for each session you create. You can set up a series of re-occurring sessions at regular intervals the settings you choose are not constrained by the settings you applied to the main Course Room.
- Creating a scheduled session
- Session settings
- Editing session details and settings
- Student access to sessions
Create a scheduled session
- Step 1: Access manage all sessions screen
- Step 2: Add session details (name, date etc.)
- Step 3: Create a session
Step 1: Access manage all session
Go Class Collaborate in the Details and actions menu on the left-hand side of your Ultra course.

Open the Class Collaborate menu by clicking on the three dots icon.
Select “Manage all sessions“.

The Blackboard Collaborate Ultra screen opens.
Step 2: Create a Session
Click on the Create Session button on the Collaborate Sessions page.
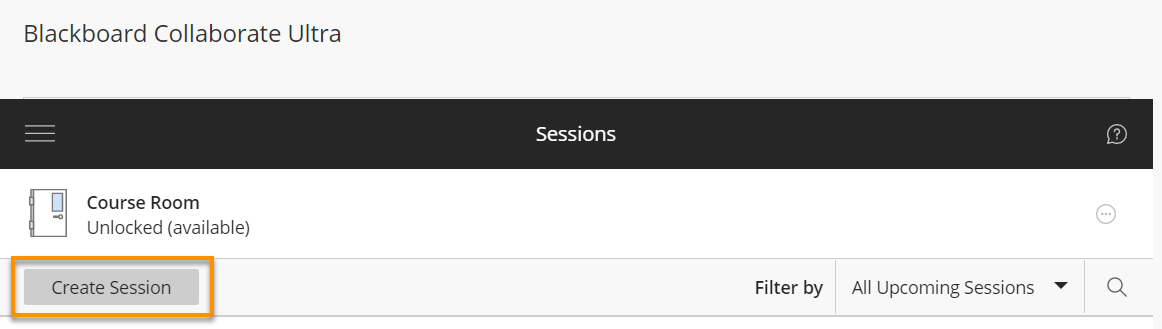
The create session panel
The create session panel opens on the right-hand side of the screen.
Complete the session set up by completing the Event Details tab.
- Session Name
- Guest Access
- Start and End date and time
- Set up recurring sessions
- Early entry time
- Description of session
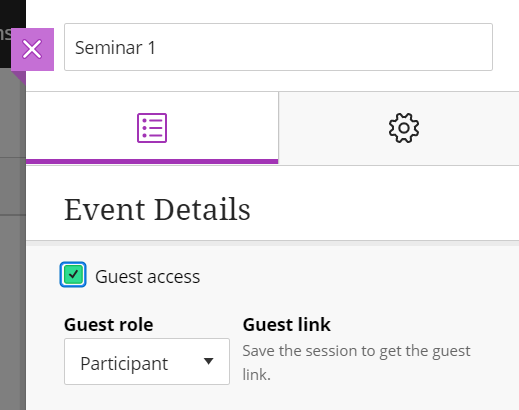
Session Name
Start by entering a name for the session.
Guest Access
Guest access is disabled by default, but you can choose to turn this on for specific sessions, as required, by ticking the box beside Guest access.
People who join the session by following a Guest Link are by default given the role of Participant. This will normally be the correct setting, but you can choose to change the default role of Guests from the drop down menu under Guest role.
Copy Guest Access link
When you have completed setting up your session and press Create, you will see the Guest Link.
Click on the Copy icon (two squares) so that you can send this Guest Link to anyone joining as a Guest

Start and End date and time
- Select the Start date and time using the calendar and time fields.
- Select and end date and time
Alternatively, you may choose to keep the session open ended, in which case check the “No end (open session)” option.

Set up recurring session
Use the Repeat session option to set up a recurring session such as a weekly seminar.
- Select the Repeat period, Daily, Weekly or Monthly.
- Select the Repeat frequency, every 1,2,3 etc. day, week, month.
- Select the day of the week the session should happen
To end the occurrences you can choose the number of occurrences or an end date.
- End after Occurrences – provide a number
- End on date – provide a date

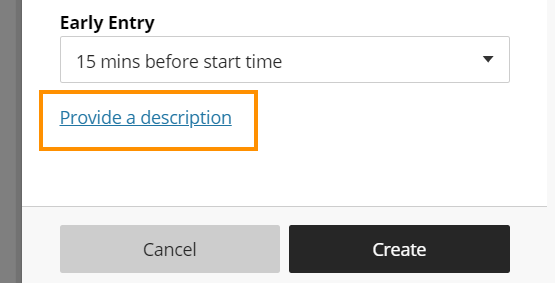
Early entry
It is good practice to let participants access Collaborate sessions early, so they have time to check their connection, and ensure that their audio / video devices are working correctly. You can allow Early Entry up to one hour before the start of a scheduled session.
Description
Click on Provide a description to reveal a box where you can add a description of the session.
This will be visible to students when they access the Collaborate session from within the Blackboard course.
Step 3: Create Session
When finished on the Event Details tab, press Create. This will create the session and the session link, which will appear in the panel and the Guest link field if you have selected the Guest access option.
Then go to the Session Settings tab to view additional settings.

Session Settings
To update the session settings Click on the cog wheel icon to open the settings tab in the panel.
- Default Attendee role
- Recording
- Moderator permissions
- Participant permissions
- Enable session telephony
- Private Chat
- Large scale session (250+)
- Profanity filter
- Multimedia
Default Attendee role
Here you can change the default Role for those attending the session – although the role of Participant will almost always be the role you want.
Options are Participant, Presenter or Moderator.
This option sets the default for all attendees you have the ability to change a specific attendees role during the session.
Recording
These options pertain to the session recording if you make one.
- Allow recording download
- Anonymise chat message
Moderator permissions
Option to “Only show profile pictures for Moderators”
Participant permissions
- Share audio
- Share video
- Post chat message
- Draw on whiteboard and files
By default all four boxes here are ticked. You may wish to disable the ability of participants to share audio and video – you can turn on audio and/or video for all participants, or for a specific user, during the Collaborate session.

Enable session telephony
- Allow attendees to join the session using a telephone
Private Chat
- Participants can chat privately only with moderators
- Moderators supervise all private chats
Large scale session (250 +)
The maximum size of a regular Collaborate Ultra session is 250 users. If you anticipate having more than 250 attendees, you will need to tick this option.
Some functionality is removed for large events – see Collaborate large classs sizes for details.
Profanity filter
Tick to sensor offensive words in the chat.
- Hide profanity in chat messages
Multimedia
- Use AWS Chime for audio and video
Some features are not yet available in Chime.

Features not yet available in AWS Chime
- Polling
- Breakout groups
- Session Engagement Insights
- Joining the session by phone dial-in
- Pointer does not appear in recordings
- Large scale sessions (more than 250 attendees)
- Not yet suitable for conducting sessions with accessibility requirements (including captioning)
For full details see The Blackboard Help Pages.
Editing session details and settings
Once the session has been created, you can edit any of the settings by clicking on the Session options icon (three dots) on the right hand side of the screen.

Student Access to scheduled sessions
Access via Details & Actions panel
Students access Collaborate in a Blackboard Ultra course via the Details and Actions panel on the left-hand side of the course content.
- If you have not hidden the course room, students can access it via “join session”.
- For scheduled sessions students will click the three dot menu and select View All Sessions
- For recorded sessions students will click the three dot menu and select View All recordings
Recordings will move to YuJa on a fixed schedule of very 31 days.

Students’ view of Sessions
The scheduled sessions will appear to student as a chronological list.
- A course room link will appear at the top of the sessions list.
- Future sessions, not yet available, will be greyed out.
- Any sessions currently open show as “in progress”
- Where recurring session have been set up use the down arrow to reveal all sessions.

Student start session
Clicking on the session name opens a panel on the right of the screen.
- A Join session link will appear in the panel
- If you have allowed telephone connection the details for students will appear here.

Guide last updated on June 16, 2022
