When to do it
Students enrolled on a module in RISIS (the University’s student records system) will automatically be enrolled in the appropriate Blackboard course. This means that normally you should not need to manually add students to your courses in Blackboard – but please note this automatic process runs once a day (overnight) and at the start of the year can take up to 48 hours to complete.
Read more: How and when are students enrolled on courses?
There may be times when you may need to manually add users to your courses, in particular when you want to add another member of staff to the course.
How to do it
1. Go to Control Panel > Users and Groups > Users
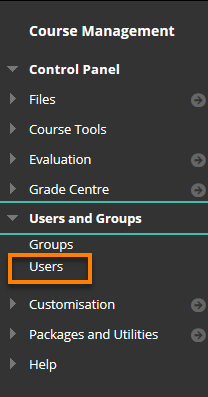
You will see a list of all users currently enrolled on the course.
The search box on this page allows you to find users who are already course members – do not try to use this box to add new users.
2. Click on Find Users to Enrol

3a. If you know the Blackboard username
If you know the user’s Blackboard username, enter it in the Username box on the screen which appears.
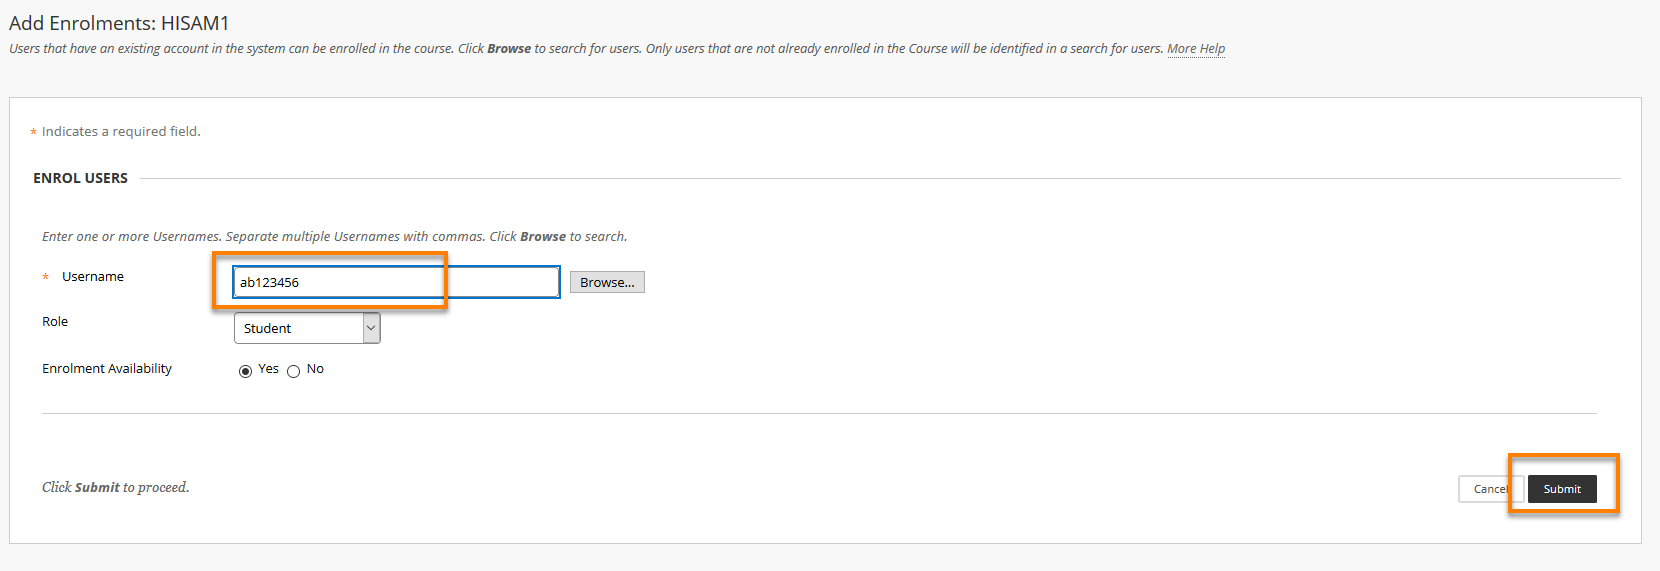
Then select the appropriate Role from the drop-down list (normally Student or Instructor) and press Submit.
As of December 2020, if you are enrolled as a Teaching Assistant on a course, you will have to enrol other colleagues as a Student, then Change User’s Role.
Do not press the 'Browse' button – just Submit.
How can I find out a person’s username?
The simplest way is to ask them. You can also find a colleague’s username from the Outlook address book.
3b. If you don’t know the Blackboard username
If you don’t know the user’s Blackboard username, click on the Browse button. A new window appears.
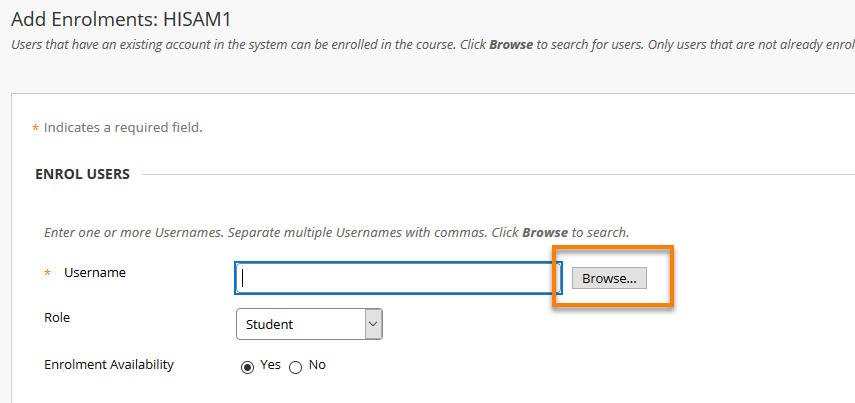

You can search for a person by First or Last Name, Email address, or Username – choose the appropriate option from the first drop-down box.
For students, if you know a student’s number is 123456, you could find them by searching for ‘Student ID Contains 123456’.
For staff, you will normally need to search by Name or Email. This will often bring up a long list of users – be careful to choose the correct person.
Note: The email address for any member of staff will end @reading.ac.uk
Never enrol a user as Instructor if their email address ends in @student.reading.ac.uk
When you have found the right person, tick the box next to their name and press Submit.
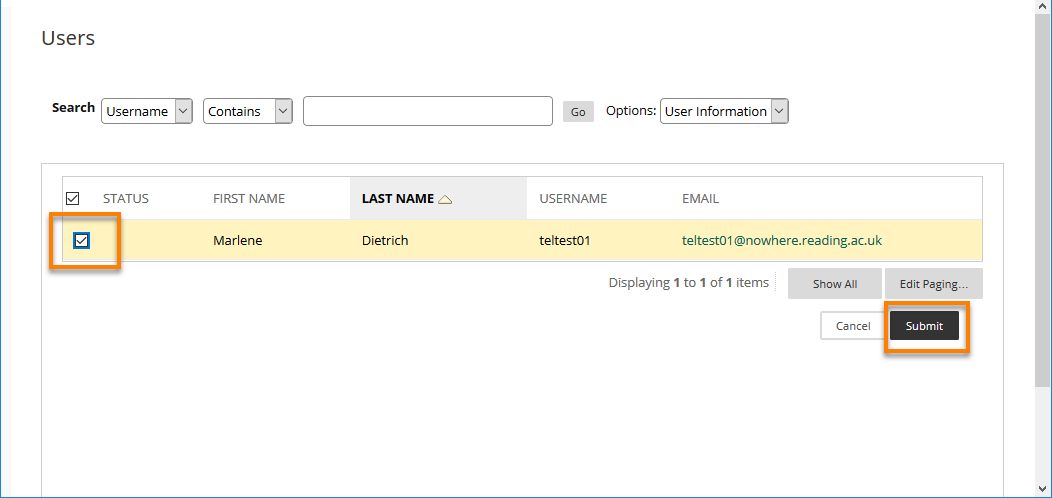
If you see a red circle with a cross next to the user’s name, this means their Blackboard account is unavailable – you can enrol them, but they will not be able to log in to Blackboard until their status is changed.
4. This will take you back to the Add Enrolments screen.
Now use the drop-down list to choose the appropriate Role in the course.
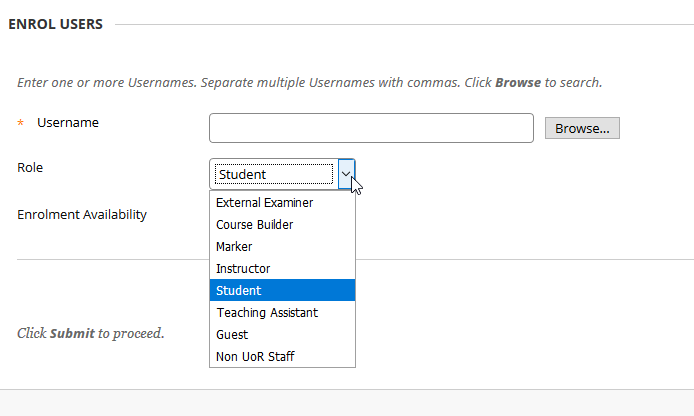
By default, new users will be added to the course as students, but you can select Instructor or other roles from the Role drop-down list.
Roles available to select are:
- Student
this is the default role; no access to the Control Panel. - Guest
limited access to the course – e.g. no access to course tools or communication, may not be able to view all course content. - Instructor
full rights to manage all aspects of the course. - Teaching Assistant
fewer rights than an Instructor, but access to most parts of the Control Panel. - Course Builder
access to most parts of the Control Panel, but not to the Grade Centre. - Marker
access to some parts of the Control Panel, principally the Grade Centre. No ability to upload or organise content.
Please note that the precise permissions associated with these roles are subject to change from time to time.
When done, click Submit.
You should see a green Success message:
![]()
If there was an error you will see a red Failure message:
![]()
You will also get a Failure message if the user is already enrolled on the course:
![]()
Why do I get a ‘No users found’ message when using the ‘Browse…’ button to enrol people?
- The search criteria or details are incorrect.
Check that the search criteria and the search information you are using are correct. If they are, then there are two other reasons why you get the message ‘No users found’. - The person is already enrolled on the course.
When you use Find Users to Enrol > Browse, this only searches for and finds users who are not already enrolled on the course.Go to Control Panel > Users and Groups > Users to see if someone is already enrolled on the course. - The user has a Disabled Enrolment
Disabled enrolments often cause confusion, because they are invisible to course Instructors even though the person’s account is enrolled on the course.Student enrolments become disabled in Blackboard when a student’s enrolment is removed in RISIS (the student registration system). Where appropriate, re-instate the enrolment in RISIS, and the student’s user account reappears in Blackboard again automatically overnight.
Note: The Search feature in Users and Groups > Users, only searches for users who are currently enrolled on the course. It cannot be used to find users to enrol.
How can I enrol more than one user?
You can enrol multiple users at the same time, as long as they are all to receive the same course role. Simply insert a comma between each username e.g. ab123456, mn123456, xy123456.
Page last updated on July 25, 2022 by andyturner
You must be logged in to post a comment.