There are several steps in setting up a Test and making it available to students:
Build a Test
set the name, description and instructions
choose the Question Settings
create Test Questions
Build a Test Canvas
There are other ways of doing it, but best practice is to create your Test first, and then deploy it in a content area (e.g. Assessments).
To do this , go to Control Panel > Course Tools > Tests, Surveys and Pools.

Then click on Tests.

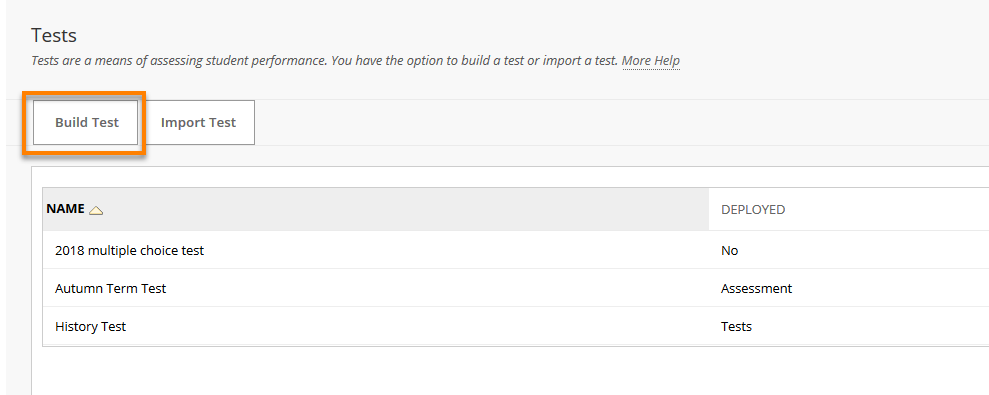
Click on Build Test .
On the Test Information page, provide a
- Name of the Test.
- A Description for the Test.
- Instructions for students taking the Test.
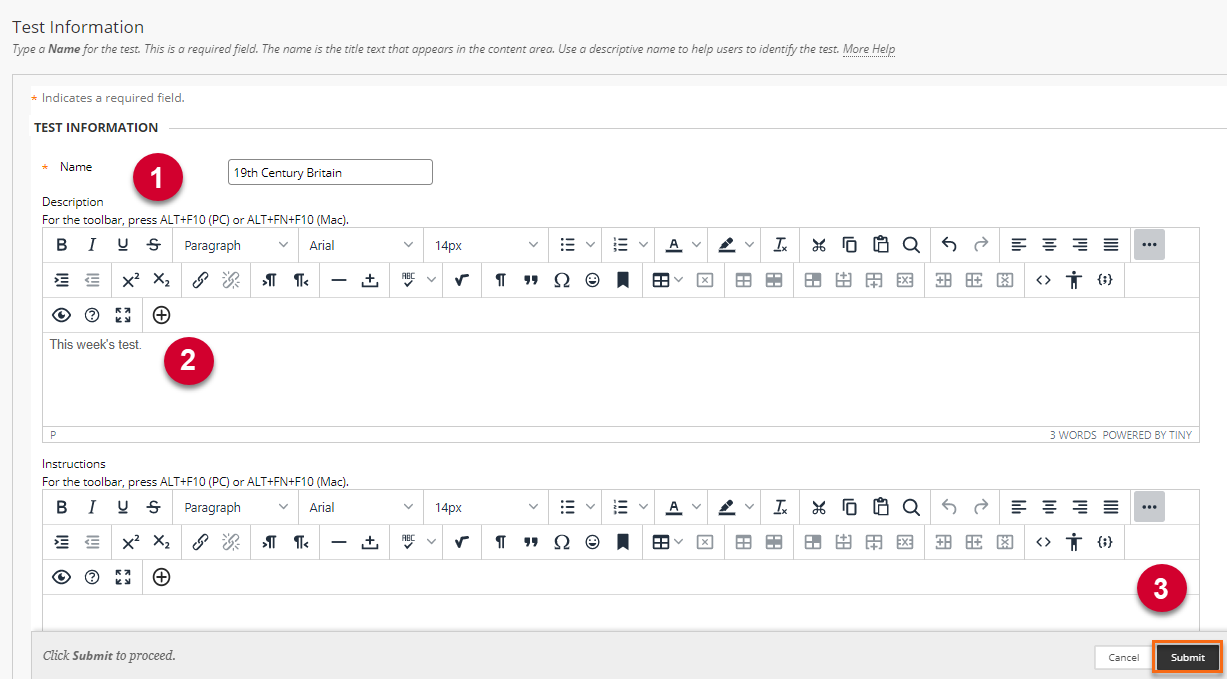
- Scroll down and press Submit.
When making the Test available to students you will have the option to show the Description and/or Instructions to students before they begin the test.
You can use the Description to provide information that students will need before they start the test. For some timed tests you might want to display the Instructions only when students have entered the test, and the timer has begun.
Populate a Test Canvas
Now you enter the Test Canvas where you create the Test itself.
Question Settings
 It is not essential to do this now, but before adding any questions it is worth looking at the Question Settings.
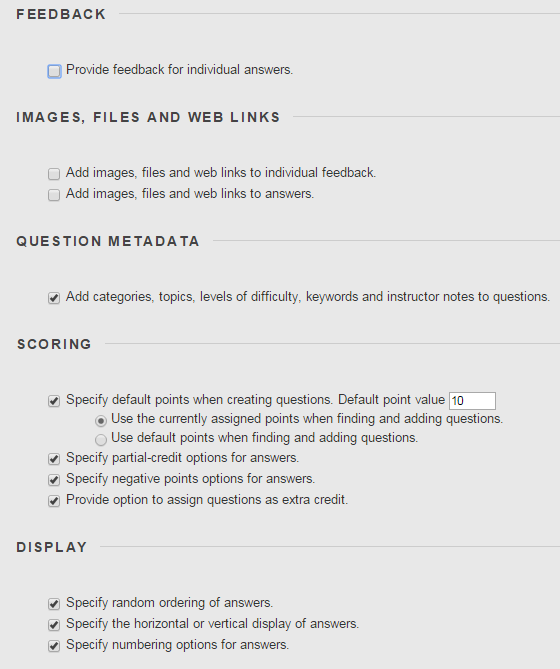
Here you can set options for the test as a whole. For example:
- Provide feedback for individual answers Tick this box if you want to provide an individual response for every right or wrong answer.
- Add images, files, and external links to questions / answers Tick here if you want to insert pictures (allows you to ask questions like “what is the name of the widget shown?”) or even audio and movie clips.
- Specify default points when creating questions By default each question is worth 10 points, but you can change this.
- Specify negative point options for answers Tick here if you wish to deduct marks for wrong answers.
N.B. This option only appears when ‘Specify partial-credit options for answers’ is ticked. - Specify random ordering of answers If you tick this box, when you create or edit a question you are given the option to randomise the answers.This option would allow you to set Answer A as the correct answer for all questions, leaving Blackboard to present the choices in a random order. Press Submit when done and return to the Test Canvas.
Set up the test questions
Now select the type of question you want from the drop-down list under Create Question.
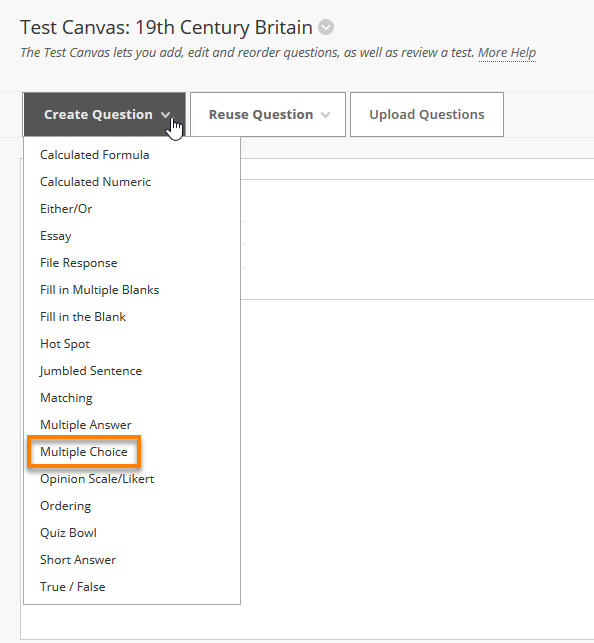
As you can see, there is a considerable choice of question types. We will use Multiple Choice questions as an example here, but this is far from being the only sort of assessment possible with Blackboard.
See the Blackboard help site for details of the various question types available.
Having selected the question type, enter the text of your first question.
You do not need to give the question a title (question titles are NOT visible to students when taking the Test).
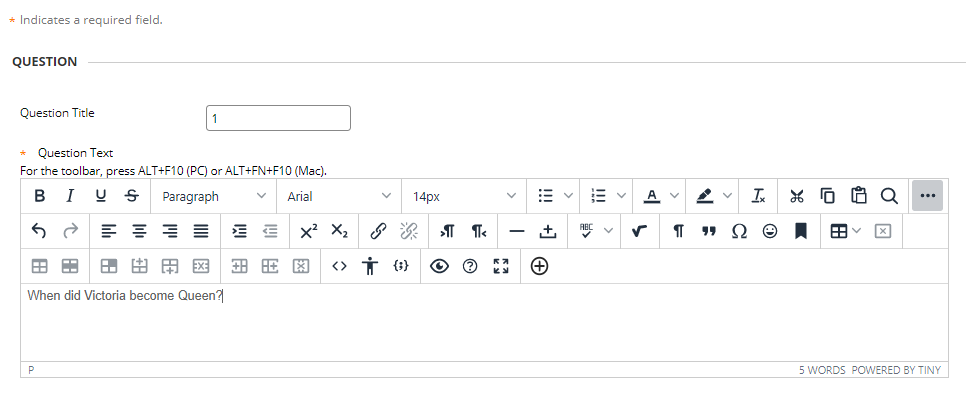
Scroll down to see the available options, and select any which you want to apply e.g. ‘Show answers in random order’.
Many of these settings can be set for the whole Test via Question Settings (see above).
Use the drop-down list under ANSWERS to choose how many answers will be displayed. The default number of answers is four – this is also the minimum number of answers. You can Remove any extra questions you don’t wish to use.
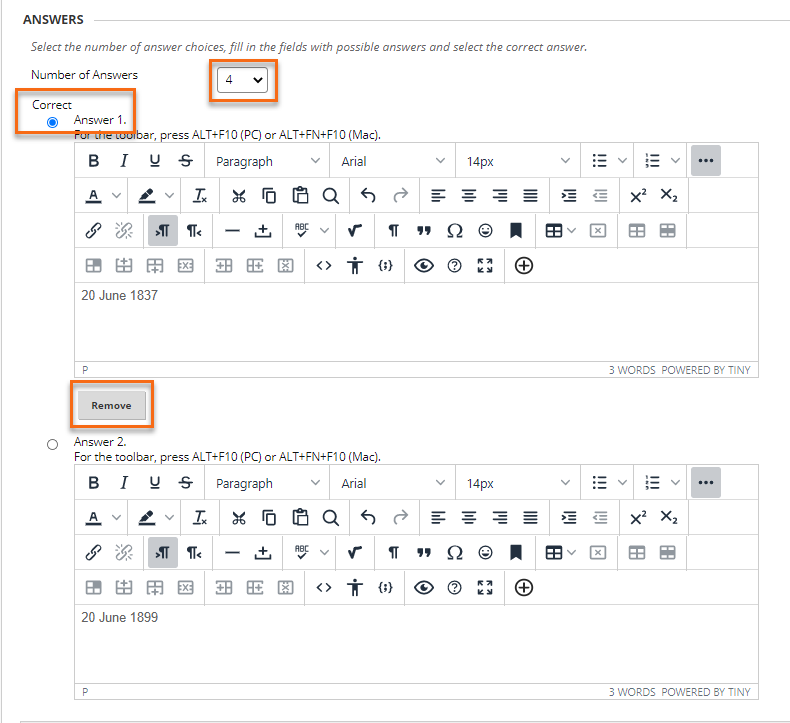
Now enter the possible answers.
Make sure you check the radio button next to the correct answer.
There are more possible options at the bottom of the screen e.g. responses to show for correct and incorrect answers.
When done, press
- Submit and Create Another to create another question of the same type.
- Submit to return to the Test Canvas.
To add other types of question
In the Test Canvas click on Create Question at the top of the page and select the desired question type.
Alternatively, hover over any question in the test, and click on the + sign which appears, to add a question above or below.

Then select the question type from the list which appears.

You can if you wish use several question types within the same Test.
Inserting files
Files, images and links can be added to questions and answers. Select the Upload icon to add images or other files.

Normally you will upload the file (e.g. a JPG image) from your local drive, by selecting ‘Insert Local Files’, and then Open.
It is also possible to upload images first to the course Fileshare, by selecting ‘Insert from Content Collection’, and then Submit.
Additional third party tools are available, Flickr Photo, SlideShare and You Tube.
These question types and fields now allow you to attach files and insert media using the Add Content button
- Calculated formula: Question text
- Essay: Answer text
- Matching: Question/Answer pairs
- Multiple Answer: Answer options
- Multiple Choice: Answer options
- Ordering: Answer options
In addition students can insert files in their answers to Short Answer questions.
For more specific advice on using video and audio files in Blackboard tests see Embed Audio and Video Files in Questions
You may need to change the name of your image files before you insert them into the test. If you ask “what is this plant?” and insert an image called hyacinth.jpg then it will be possible for the students to see this file name in their Internet browser! So you would want to rename this file to something less meaningful e.g. question1.jpg
When you have finished in the Test Canvas, press OK.
Making the Test Available
When you have created a test, you need to create a link to it in one of your course content areas e.g. Assessments.
Creating a Test directly in a Blackboard course
It is probably best to create your Test, then set up a link to it. However you can add a Test, then create it.
Go to the section of your Blackboard course where you want to place the test and select Assessment > Test.
Click on the Create button next to ‘Create a New Test’.
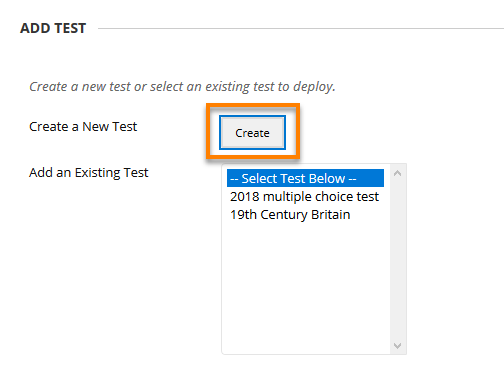
Then follow the steps shown on screen to create, then deploy a new Test – the process is essentially the same as shown earlier.
It is possible to Export a Test (or sets of questions) from one Blackboard course to another – see separate user guide on Copying Tests.
Page last updated on March 3, 2023 by Peter Moll
You must be logged in to post a comment.