To set up a Turnitin submission point in Blackboard Learn Ultra, you will need to locate Turnitin in the Content Market as it is a third party tool.
- Setup the Turnitin Assignment in the LTI tool (video)
- Create assignment
- Optional Settings (video)
- Settings and Rubrics
- Similarity report settings
- Edit submission point
- Moving a Turnitin submission point in Ultra
Set-up a Turnitin Assignment in Ultra (video)
Create a Turnitin assignment
Go to the area in your Ultra course where you wish to add the submission point. For summative submissions this will be in the Assessments are and in the named folder for this specific assessment.
Open Turnitin
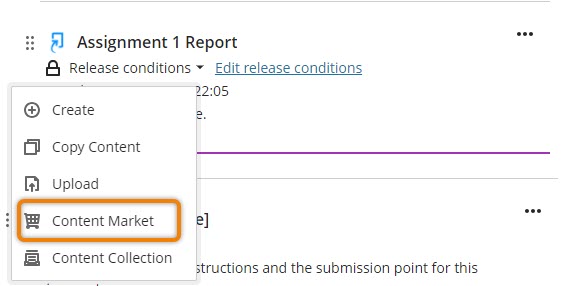
Hover over the divider link at the exact point where you wish the submission point to appear. When the line turns purple and the + icon appears, click on it to reveal the add content menu.
From the add content menu select Content Market.
The Content Market has many third party tools available to use in your course. Turnitin is represented as an icon named Turnitin LTI Assignment under the heading “Institution Tools”. Click on it to open Turnitin.
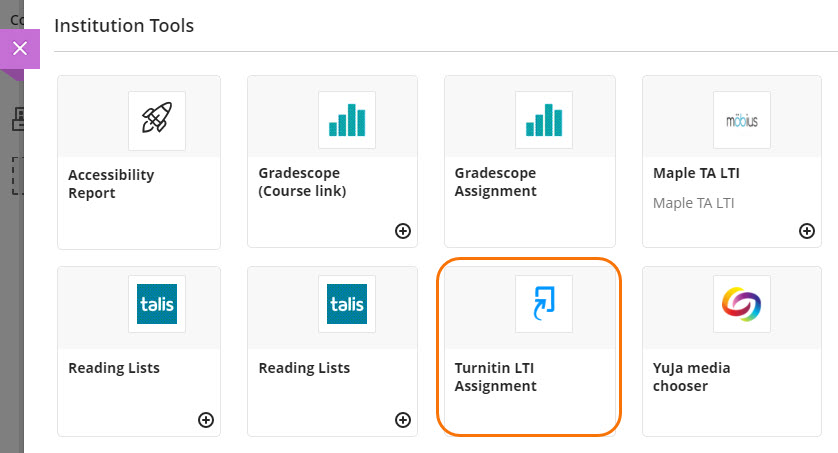
Once you have clicked on the Turnitin LTI Assignment link Turnitin will open a new create assignment page.
Complete setup in Turnitin
When the Turnitin LTI opens you will be able to follow the assignment set up steps.
In the set up screen add your Assignment Title and Instructions. Add your Points possible, now under Max Grade.
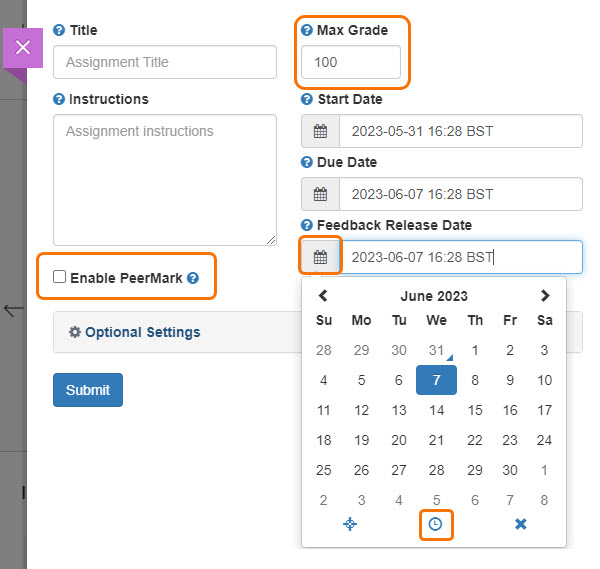
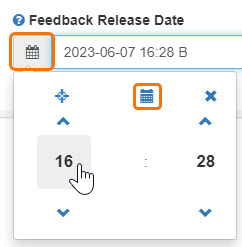
Set the dates by using the calendar. Click on the Clock icon to change the due time.
For summative assessment set the dates according to EMA workflows:
- Start Date – 4 weeks before the deadline (or the default date)
- Due Date – the deadline date and time
- Feedback Release Date – 15 day Turn around Time (TaT) please remember these at 15 working days, what out for bank holidays.
Before opening in the Optional Settings, tick the Enable PeerMark box if you will be using the PeerMark assignment feature.
Complete the optional settings to your preferences and submit.
Blackboard Edit options (e.g. mark as formative)
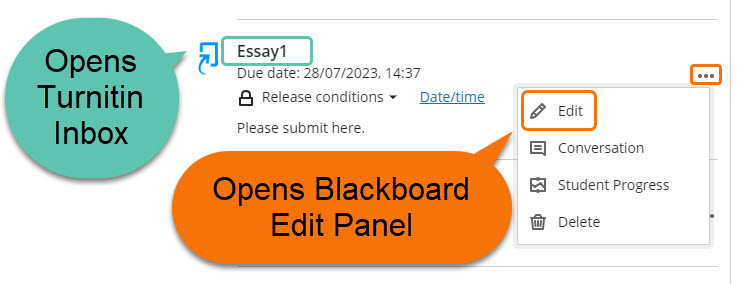
Once the Turnitin submission point has been created you can open the Blackboard edit panel to set the category or mark as formative.
Open the edit panel via the three dot menu on the right-hand side of the submission point.
- (a) Open the Release conditions panel to add a hide date or other rules.
- (b) Do not select the option to Open in new window. This can cause access issues for users.
- (c) It is possible to allow Class conversation, not recommended for summative submission points.
- (d) Select or change category – categories can be created in the Gradebook settings panel.
- (e) It is possible to mark this submission as formative.
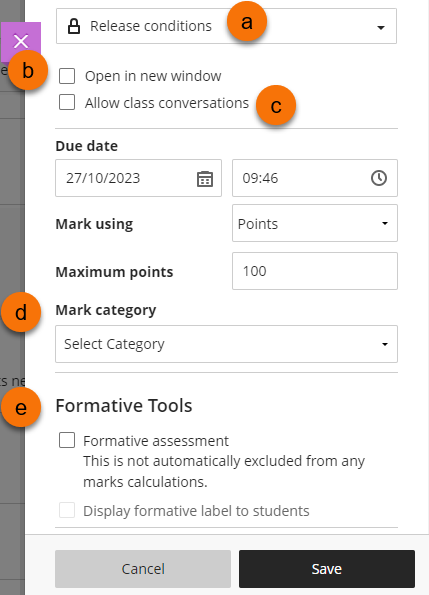
Save changes and return to the Course Content.
Optional Settings (video)
Submission Settings and Rubric
- Submit paper to
Select whether the assignments will be sent to Turnitin’s data archive. under Submit Papers to. This is usually set to Standard paper repository, but you can choose ‘Do not store the submitted paper’ for draft submission areas. - Allow any file type
Selecting Allow submission of any file type will allow any type of file to be uploaded to Turnitin, but won’t produce a similarity report for non-office type files, and larger or non standard PowerPoint files. - Allow late submissions
- Schools with a single submission point = Yes
- Schools with separate on-time and post-deadline submission points
- on-time assignment = No
- post-deadline assignment = Yes
- Allow anonymous marking
Select whether you will be using anonymous marking. - Attach a rubric
Attach a rubric to mark with, and choose from your Rubric list or Launch the rubric manager to create a new one.
Post-deadline submission points
The due date and start date for the post-deadline submission point would normally both be the same as the official deadline for this assignment. However, Turnitin will not now allow you to set the due date as the same as the start date. Therefore, please set the post-deadline due date as 1 minute later than the official deadline.
| Type of Assessment | Start/Due dates and times |
|---|---|
| on-time assignment | due date 12:00 |
| post-deadline assignment | start date 12:00 due date 12:01 |
⚠ WARNING! Turnitin may appear to allow you to save the same date and time for Start and Due dates, but will save the Due date as 24 hours after the Start date. The original due date will show in Blackboard but will be altered in Turnitin.
Similarity Settings
These settings help you set the most useful similarity report parameters for the assignment.
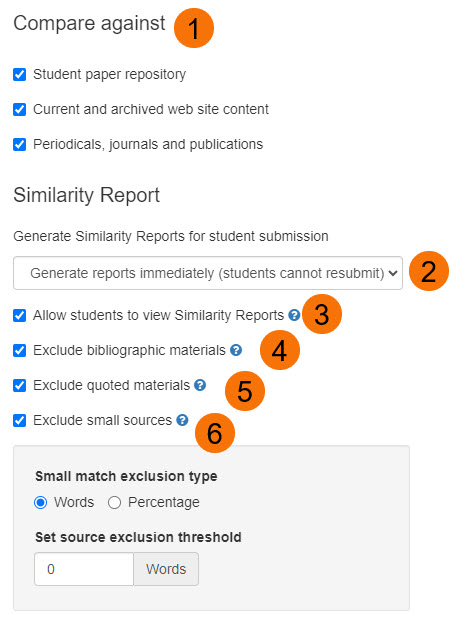
- Compare against
leave all of these selected. - Generate Similarity Reports for student submission
Choose when similarity reports are generated and whether students can resubmit until the deadline. - Allow students to view Similarity Reports
Select whether students will see a Similarity Report for this assignment. - Exclude bibliographic materials
Select the checkbox to exclude text appearing in the bibliography, works cited, or references sections of student papers from being checked for matches when generating Originality Reports. You can overwrite this setting in individual Similarity Reports. - Exclude quoted materials
Select the checkbox to exclude quotations from being checked for matches when generating Similarity Reports. You can overwrite this setting in individual Similarity Reports. - Exclude small sources
Select the checkbox to exclude matches that are not of sufficient length (determined by you) from being considered when generating Similarity Reports. A box will appear, where you can exclude matches by word count or by percentage - Exclude assignment template
You can now also exclude any proformas or templates from the similarity to see the true match to original work. You can upload the blank document all student use for the assignment here.
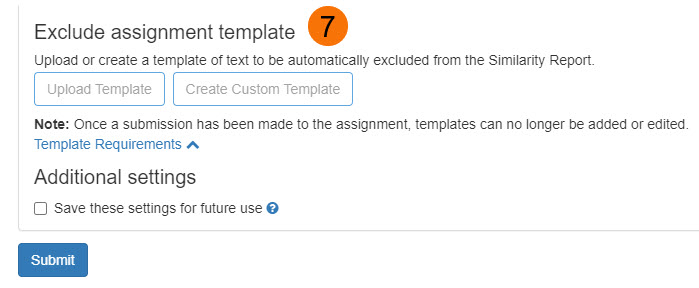
After completing all the settings, and choosing whether to save these for next time, click Submit.
The Assignment will appear in the Course Content.
Edit Turnitin Assignments
Editing the submission point happens in three different places, please see our guide Edit Turnitin Assignments for instructions.
Release conditions are set up automatically to accommodate the Start Date. This is due to the way Turnitin and Blackboard integrate.
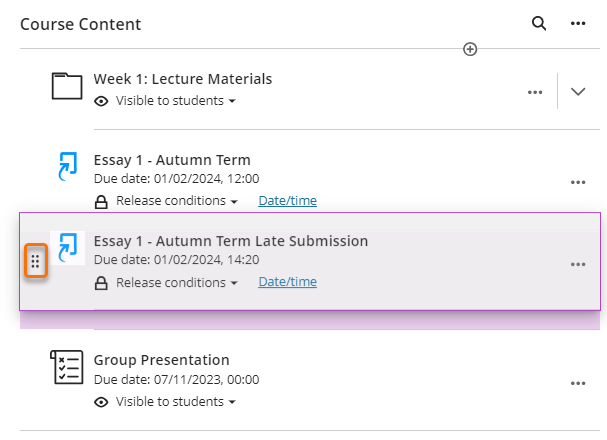
Moving a Tii Submission point
When the submission point has been created it will appear at the point in the Course Content where you called up the add content menu. You will be able to move it if you need to.
To move the item hover over the item until it darkens and a dotted icon appears on the left-hand side. At that point, click to pickup the item and release when you are happy with its location.
Guide last updated on January 30, 2025