It is possible to copy content from one Course or Organisation to another when you are enrolled as Instructor, Leader, Teaching Assistant or Course Builder.
- What content categories can be copied?
- How to Copy Content.
- Copying specific types of content.
- Course Banner.
- Course Content items (Learning Modules, Folders, Documents, Files).
- Blackboard Assessment Tools (Assignment, Test, Rubric).
- Announcements, Discussions & Journals.
- Third-party tools from the Content Market (including Turnitin).
- Course storage quota awareness.
Do you need to copy materials from courses pre 2024-25? See Copy content from pre 2024-25 courses.
What content categories can be copied?
Items that can be copied using the Copy Content feature are grouped by:
- Content: Contains items that listed under the Course Content tab.
- Discussions: Items listed in the Discussions tab and inserted in content.
- Announcements: Lists all posts made in the Announcements tab.
- Question Banks: Question Banks used to generate question pools for Blackboard Tests.
- Rubrics: Any rubrics created for Blackboard Assignments.
- Mark Schemas: Any custom schemas created to use in the Gradebook.
- Settings: Contains the Course Banner Image.
How to Copy Content
- Step 1: Go to the place in your course where you would like the copied items to appear and click Copy Content.
- Step 2: In the Copy Items window search for the Course (or Organisation) you want to copy content from.
- Step 3: Find the items you want to copy.
- Step 4: Select and copy the items.
- Step 5: How copied items appear.
Step 1: Go to a place in the course
Always start the copy process in the place where you want the items you are copying to appear.
- Click a Learning Module or Folder to open it.
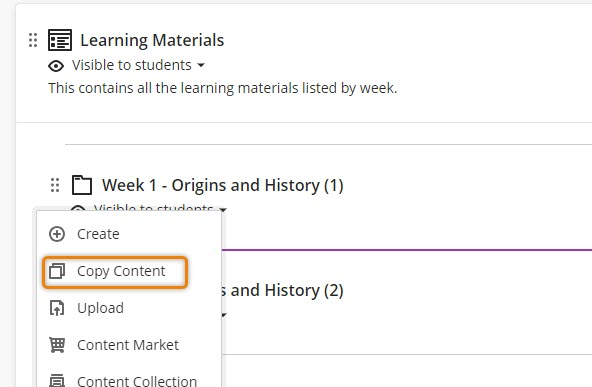
- Hover over the divider line where you would like to add the content, then click on the plus icon to open the Add Content menu.
- Select Copy Content to open the Copy Items screen.
Step 2: Find the course to copy from
In Copy Items you can find all the Courses and Organisations you are enrolled in with the role Instructor, Teaching Assistant or Leader.
- Choose between the Courses and Organisations tabs, as required (a).
- Search for the course you want to copy items from (b).
- Use a the Course title or ID to find it.
- To enter the course and see the content:
- click on the title (c).
- or the arrow to the right of title (d).
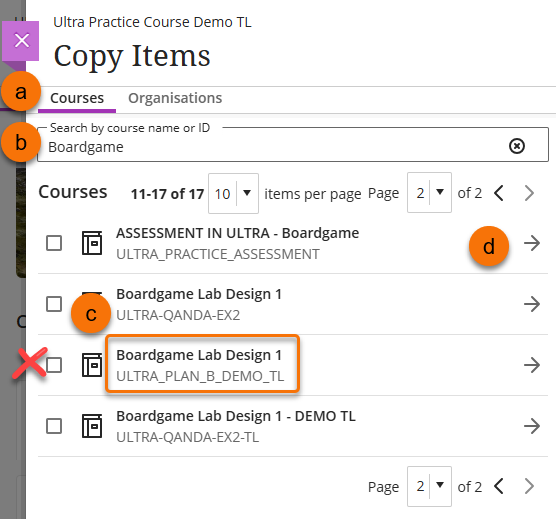
Important: ![]() Do not check the tick box beside the title of the course. If you select the course at this level, it will copy the whole course and all content. This is not recommended as it copies items that should not be copied and will be time consuming to tidy up.
Do not check the tick box beside the title of the course. If you select the course at this level, it will copy the whole course and all content. This is not recommended as it copies items that should not be copied and will be time consuming to tidy up.
Step 3: Find the content
After clicking into the course you want to copy content from, it will open as a list of folders.
- Each folder represents a category of content that can be copied.
- The Content folder is where you can find items in the ‘Course Content’ tab of the course.
- Click on the title or the arrow to the right of the title to open a list of the items in each folder.
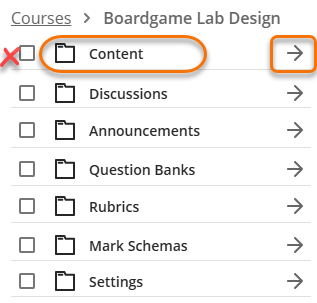
Important: ![]() Do not check the tick box beside the category folder. If you select the folder this level it will copy the all the content in that folder. This is not recommended as it copies items that should not be copied and will be time consuming to tidy up.
Do not check the tick box beside the category folder. If you select the folder this level it will copy the all the content in that folder. This is not recommended as it copies items that should not be copied and will be time consuming to tidy up.
Step 4: Select and copy the items
Once you have drilled down to find the content in a specific catergory:
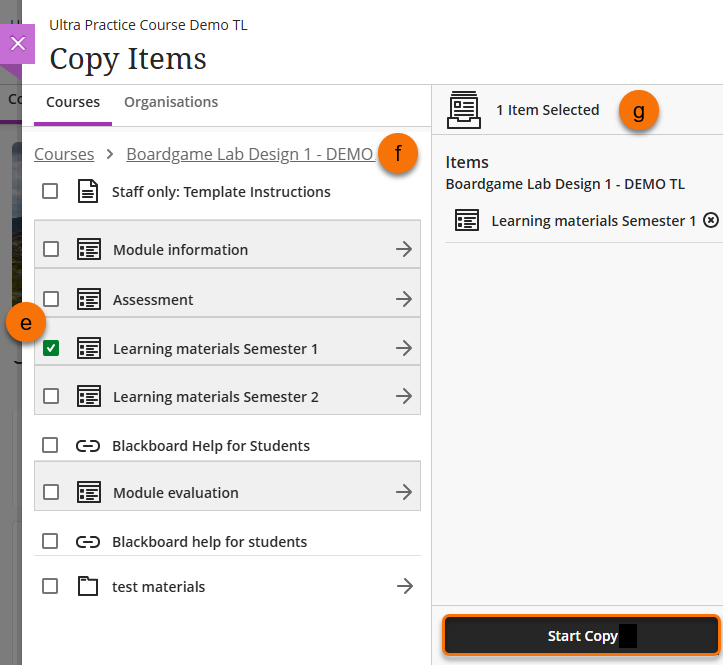
- Tick the box beside the title to select items to copy (e)
- All the items you select will be added to the Items Selected panel. (g)
- Check what you are copying in the Item Selected panel (g).
- Click the Start Copy button.
Be aware: When you tick the box for a Learning Module or Folder, all items within it are selected and copied.
Tip: Use the breadcrumb trail links if you need to navigate back a level. Use the three dots (…) to show sub-levels. (f)
Tip: If you require most items in a Folder or Learning Module copy it and then Delete the copied items you don’t want.
Step 5: How copied items appear
The copy starts and a ‘Copying Content’ wait screen will appear. This process will take longer if you are copying a lot of content.
The content items will be copied into the specified location, where you clicked to add the content.
All copied items will be set as ‘Hidden from students’ by default.
You can use the Batch Edit to make multiple items visible to student in one action.

Advice for copying specific types of content
Banner Image
- To locate the Banner image click the Settings folder in the Copy Items window. How to copy the Course Banner.
Course content items
Course content items are: Learning Modules, Folders, Documents and Files.
- Copying a Learning Module and Folder copies all the content inside it.
- To reuse a Learning Module image, right click on the image, select “save image as” to save the image to you computer.
- Do not copy a Learning Module into another Learning Module.
- Do not copy a Folder into another Folder.
- Edit copied files using ‘Replace’ to update it with a new version.
- Be aware of copying large files – course quota and reducing file sizes.
Blackboard Assessment tools
- Do not copy Blackboard Assignment submission points. These are setup new each time. Delete if inadvertantly copied.
- Copying a Test automatically copies any Question Bank/s it uses. (If you delete the copied Test the question bank is not deleted.)
- Only copy a Question Bank seperately if Test using it is not copied.
- Essential Advice for copying Tests from a pre 2024-25 course.
- Rubrics can be copied separately to attach to a newly created Blackboard assessment.
Announcements, Discussions & Journals
- Settings and dates copy unchanged and will need to be updated.
- Only the Discussion or Journal Topic is copied. No entries or replies are copied.
Third-party tools from the Content Market
Third-party tools are: YuJa Video, Talis Online Reading List, Turnitin, Gradescope (and specialist tools; LearnSci, McGrawHill, Mobius, Potential.ly)
- Links to third-party tools added from the Content Market now appear as items to select using ‘Copy Content’. (Following feature enhancement – September 2025.)
- Do not copy Turnitin and Gradescope Assignment submission points. These are setup new each time. Delete if inadvertantly copied.
Online Reading List links
This guidance refers to links inserted inside Learning Modules, Folders and Documents.
- You do not need to copy the main Online Reading List link as it is part of the course template.
- Be aware: If links are copied before the Online Reading List rollover at the end of June it will link to the previous academic year’s list. Wait until after the end of June to copy these links or re-link the Reading list. (UK Campus courses only.)
Yuja Video links
This guidance refers to links inserted inside Learning Modules, Folders and Documents.
- You do not need to copy the main video (YuJa Channel) link as it is part of the course template.
- Important: Do not copy classroom capture recordings made for a previous student cohort or delete the links if they are copied. (University Policy requirement.)
- Only videos inserted into the content of the course can be copied.
- Students have permission to view copied videos by default but they do not appear in the courses ‘Video (YuJa channel)’ unless you publish them to it. How to Publish videos to the course channel.
Course storage quota awareness
There is a file limit applied to Ultra courses. Files larger than the 250MB limit can be copied where they were uploaded to previous courses. This can fill up the course quota of 5GB and prevent any further materials being uploaded. Please take care to keep individual files under the 250MB limit and avoid copying the same file more than once.
- How to manage and reduce the size of your files in Blackboard.
- How to delete files completely from a course to free up storage space.
- Use YuJa to store and share videos in a course.
Guide last updated on September 3, 2025